Monday, February 20, 2012

Front Coilover Conversion with Diamond Star Specialities

So finally I started working on the front coilover conversion. Lift the car and place them on jack stands, safety first.

Loosen the nuts on strut that connect to the hub mount, remove the nuts and bolts connected to the brake lines on the front strut.

Remove the top nuts off the top hat

Remove the front strut assembly completely

On the top of the strut assembly file down the ring of the strut so that the top hat of the coilover will slide thru. I ended up taping the threads and strut shaft to protect them from getting filed.

Strut assembly side by side. With a 17mm socket remove the nut on the bottom of the strut. After removing the nut, with a alan key turn the bottom so that the insert come out.

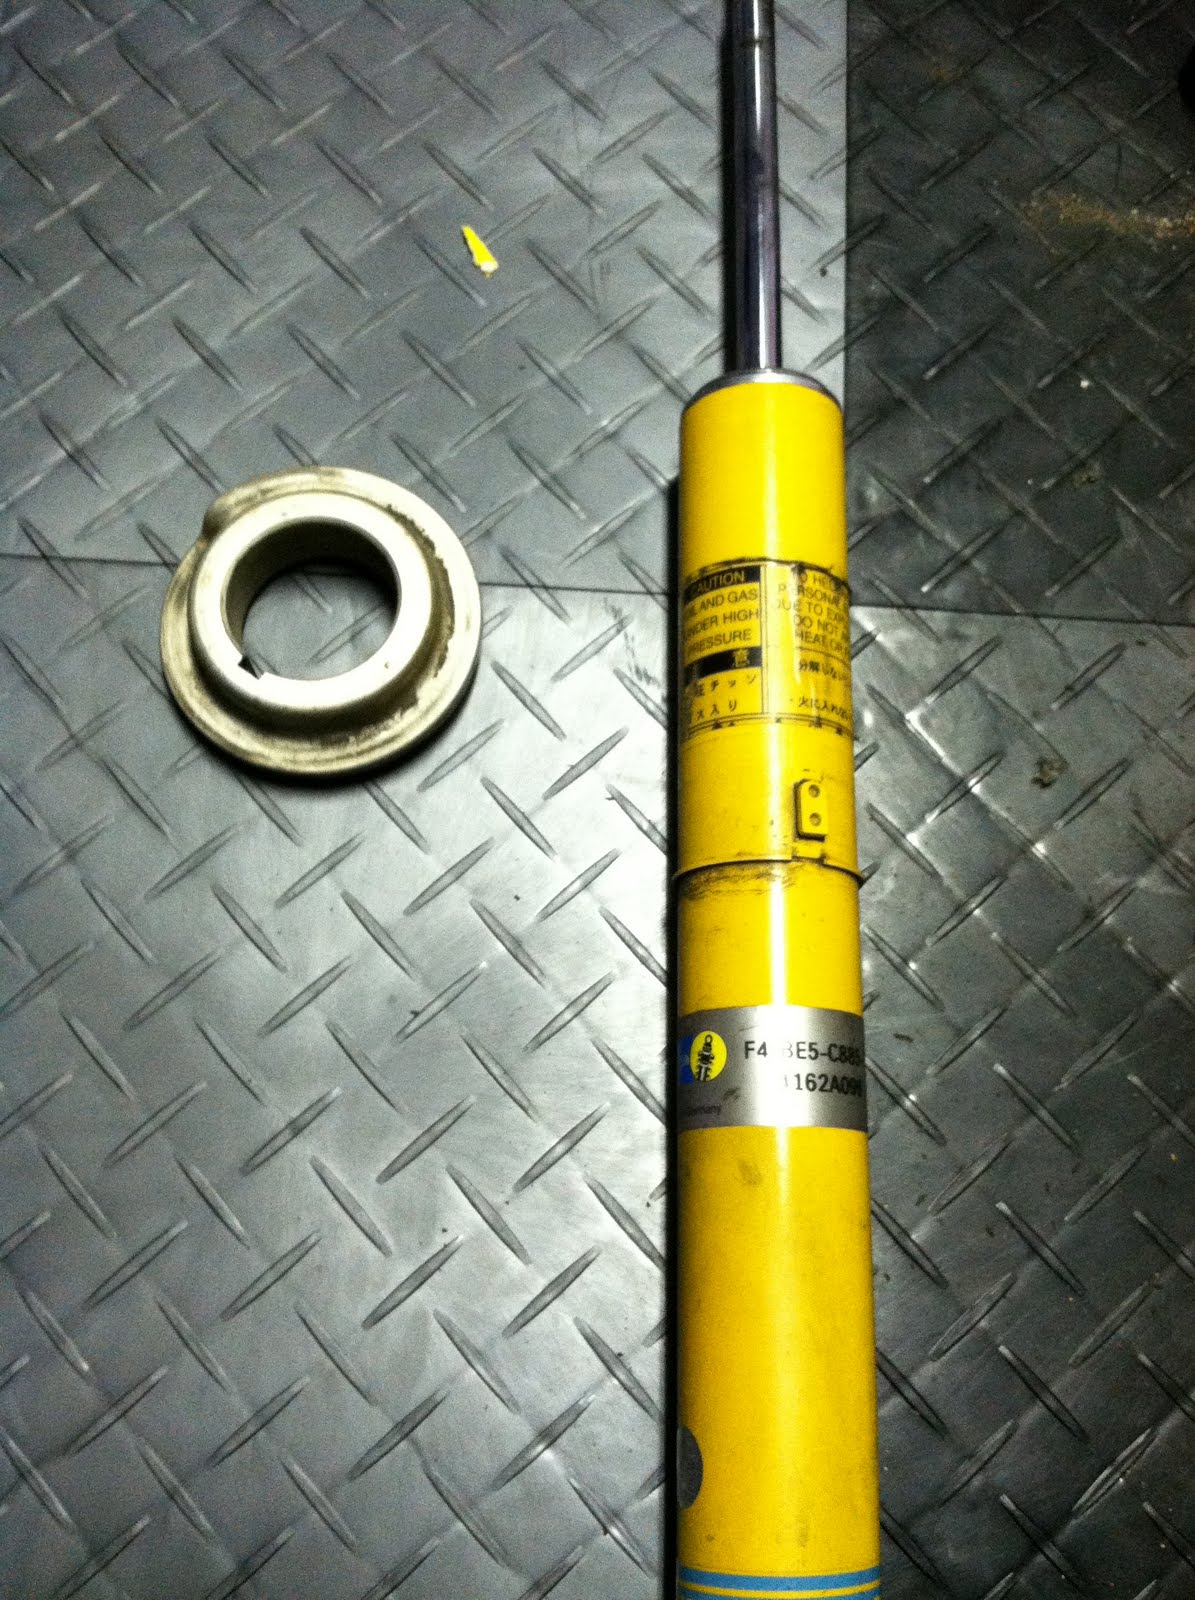
After removing the insert.

The insert.

So after removing the insert, the original spring perch needs to be cut off and ground down, this allows the sleeve to slide over. As for the aluminum cap for the bearing which I will call the bearing cap, take a flat head screw driver or a chisel and knock it off with a hammer. Below is what it should look like.

So next you may want to paint the area you just cut and ground down to not only prevent rust but you also look more professional. I used Dupli-color School Bus Yellow, its a great match.

Next with the provided Split Clamp Collar provided with the DSS kit you want it as low as possible that it can clamp evenly on the strut housing. On this particular application I had the Split Clamp Collar rest above the weld.

You will want to position the Collars so that the bolt openings are positioned at a 90 degree from the strut ears. The collars need to be tighten evenly and torqued at 25ft/lbs. And then slide the coil over sleeves over the strut.

This is what it should now look like now.

The strut bearing caps were hammered back in and the insert was place back into the housing. Dont forget that the inserts need to be threaded back into the hole at the bottom of the strut.

This is the supplied hardware for the top hat of the spring. I placed it in order of how it needs to be assembled. For the needle bearing it is highly recommended to lube them up with a Moly wheel bearing grease.

Here is the complete spring hat put together.

The complete coil over. On mine I put on a helper spring which is not included in the kit.

Installed on the car.


So after the install, I went for a drive and noticed some noises coming from the springs. What I found was the strut bearing caps were hitting the spring so I took them apart and ground down the bearing caps so they would not interfere with one another.

Tuesday, August 2, 2011

Coilovers Project (rear)

Despite my busy schedule I still somehow manage to enjoy doing things to the car. The next project I wanted to tackle on is creating coil overs for the EVO. Some might say why not get some off the self stuff. There are so many out there, but from what I experienced, I have learned that majority of them are not specifically designed for the car. Now I'm not saying that every company is doing this, but majority of them are.

I got the idea of doing this through my buddy Mike Croutcher at Diamond Star Specialties who was once well known in the DSM community for his knowledge of suspension tuning and performance tuning. It was unfortunate that he moved to Germany but he is now is back in the States and is getting his hands and head into the EVO and Subaru community. Mike and I have also a mutual friend, Shaikh (pronounced Shake) who specializes in revalving Bilstein shock and have revalved allot of shocks for SCCA National winners and is more than capable in handling the revalved for our shock. It was this idea of getting the Bilstein revalved that has convinced me in doing this project.

The parts used on this project was from Diamond Star Specialities (805) 541-4483. Mike is very patience and can help you in all your suspension needs and other things. Currently he is working on the top hat for both front and rear which you will soon see.

Now onward into the project

Rear Strut Assembly


The Rear Strut laid out


Hammer off the collar of the strut

after hammering off the collar I noticed a tab on the strut which needs to be removed inorder to fit the coil over sleeves on to the "C" clip that will hold the coil over sleeves in place.


These are the sleeves I used for the project. For the rears I am using the the 5.00" coilover sleeves.


A pic of the sleeve on the strut


The Completed assembly


Next to come will be the fronts
More detail will come later.

http://diamondstarspecialties.com/
http://www.fatcatmotorsports.com/

Friday, April 22, 2011

Finally some updates

So I know it has been awhile, but I guess I really didn't realize time has flown by so quickly. Work has been keep me very busy and tired these days. As for what is new, well, two things has changed since my last update. One I got a factor front lip and second is that I have some tarmac springs from GTWorx.

The GTWorx's tarmac springs were supposedly designed for the person who is daily driving their car and who does occasional track days and auto xing. The spring rates are 300lbs/sqin for the front and 300lb/sqin in the rear, which is designed to be somewhat neutral balanced on the EVOX. I'm not going to go in full detail about suspension design but some of you might ask why are the spring rates the same and should that cause more over steer. B/c the EVOX has multi link suspension in the rear and the location of the pick up point for the rear strut which reduces the effectiveness of the spring that is why the rates in the rear are as high as they are. The stance of the car has dramatically changed it looks. Its allot lower than what I have come to expect.

The ride quality is decent, I am currently riding on stock Bilstein MR Struts, I can totally tell that the Bilstein are doing its job on the high speed, the increase in velocity of the struts are allowing the springs to its job. The Bilsteins could use some more low speed valving cause its alittle jump on the low speed driving.

The Factory Lip is something I have wanted for the fact it creates more down force. Watching allot of the time attack cars especially Ryan Gates who drives the Blue EVOX. He claims that the the lip on his car which is the Voltex Brand (looks like the factory lip but is slightly more extended) creates more down force and makes his car stable at high speeds.

May 15 is around the corner and the local college at De Anza is hosting the annual autocross event called Duel at De Anza. The Norcal UFO group is the one who organizes the event and all proceeds goes to the De Anza Autotech school, so going to this event not only is fun but going towards a good cause. With the current setup I have I fall under the category STU, which I believe stands for Street Touring Ultra.

Tuesday, January 4, 2011

Trackday at Mazda Raceway :Laguna Seca

New years eve I signed up to do a trackday at Mazda Raceway Laguna Seca, which was hosted by NCRC (Northern California Racing Club). This was my first trackday I have ever done and I was excited and scared all at the same time; sure I have autocross, gone gokarting, drive spirited along many twisty mountain roads, and played GT5 (Grand Turismo 5) on my Playstation 3 religiously. But nothing really gives you that feeling of stepping foot on a famous race track where professional race car drivers have raced on and have crashed on.

I had the luxury of checking out the track prior to my trackday by attending the Global Tuner Grand Prix and what I have learned was that the "Cork Screw" is a 3 story drop. Playing GT5 you don't really notice its a 3 story drop, even looking at videos on youtube or even pictures really don't depict the awesomeness of this steep decent. Looking at this track in it's face seeing Porsche GT3 Cup cars with professional race car drivers crash in to the wall of the "Cork Screw" only made me more nervous.

On the map above the "Cork Screw" is turn 8. So Laguna is not a novice track, but once you know the lines and the markers to help you over comesome of the blind turns you're good to go.

This first video below is w/ my instructor. This video was captured on my 4th session. I highly recommend getting an instructor if it is your first time doing a track day or driving Laguna Seca for the first time.


This second video is w/o the instructor.


I must thank Mike at DSS (Diamond Star Speicalist) www.diamondstarspecialties.com for tuning my car. His tune was very smooth, no rough spots and improved the horsepower delivery on the car. If you need your car tuned he's the guy to ask, they take their time in making sure everything is running correctly and can tune according to the type of power delivery you want.

I must also thank Flowmaster for their new Hushpower DBX, this muffler was great it keeps the car pretty quiet, yet flows quiet well. If you have a droning problem in your car or if you have strict sound regulations then this muffler is for you. At Laguna Seca they have a sound restriction of 92dbs and this Hushpower muffler made it worry free of any black flags.

And last ATP turbo, who was kind enough to let me try out their O2 housing down pipe. This is a nice piece and is upgradable to use an external waste gate.

Some pics taken at Laguna Seca.

Sunday, November 14, 2010

Brake duct project

So I have put my brake ducting system project on hiatus. My track days at Mazda Race Way at Laguna Seca is approaching soon and was worried about brake fading. Brake fading for those of you that don't know is when your brake system have reach beyond the capacity of the brake system (where you lost the ability to stop/slow down). This is caused when there is excessive build up of heat, it can come from any one of these causes or any two or even all three: mechanical, friction or fluid.

Currently the brake pads I have on the car is Hawk HP plus, which is more of a autocross pad than a track day pad. And being at Laguna Seca which has rolling hills I was concerned that I would be braking quite often and have brake fad. Brake fluid is going to be replaced w/ ATE Super Blue, which has a boiling point of 536 degree F and and a wet boiling point of 388 degrees F.

So I have decided to get Porsche GT3 Brake ducts, the idea came from the evolutionm.net forums by goofygrin. Pick up a set on ebay for 36.00.

I had to make a few modification to them by trimming the tabs, but installations when in fairly easy, to keep it in place zip ties were used to keep them in place.


The ducts direct air directly to the bottom of the brake rotors which "should" be adequate cooling. (crossing my fingers)

So you maybe wondering why the project was put on hiatus, the reason is simple I was not ready to cut into the frame of the car, yet. The car is too new and too nice, but later on when the car is slightly older.

Wednesday, October 20, 2010

more on the ducting

So I picked up a Aluminum sheet metal and started to draw out my patterns and started
cutting away.


Cutting took some time, cause I first started using a dremel w/ a cut off wheel, I later on changed to a angle grinder which was much faster but not as clean.

One thing I realized I could really use is a sheet metal break.

So I took a break in making the inlet pieces and started making the pieces for the bumper beam deflectors.

To get the curvature I rolled the piece over a 3.00" tubing.


Inserted the deflector into the bumper beam.

Another angle on how the deflector will work when air is traveling through the bumper beam. Looks like a success.

All and all I feel very content on the progress, and hope to have more updates. Note to self that I need to remember to take pics when I'm working so I can show the progress.

Wednesday, October 13, 2010

Autox at Great America

I recently had the opportunity to go auto crossing and one of my buddies allowed me to use his gopro on my last run. This run was my second fastest time of 46.709, my fastest lap time was 46.667.


My first two runs were in the 48 sec realm, and on my 3rd run someone asked me what did I do differently to break into the 46sec realm, and I told him that I turned earlier to compensate for the understeer I was encountering.
After this auto cross I noticed that my rear sway bar endlink was off, which I hope will allow me for faster times.